Thursday, March 31, 2022

A Good Man Remake

Stampin' Up! is retiring this stamp set, A Good Man!  It has some really nice masculine images and sentiments!  First up is the card we made in class.  Second card is the remake!


Aren't these images beautiful?  These make great Father's Day, Birthday, Retirement, etc., cards.  

Here is a remake of one of the other cards from this class I held last year.  This is one of my favorites because I love the Share What You Love DSP.  Although this has been retired, I still have a lot left to play with!


I hope you enjoy these remakes!  

Happy Crafting,

Desiree'


Wednesday, March 30, 2022

In the Moment

Today I'm sharing a remake of one of our class card kits.  We made these cards using the stamp set, Beautiful Moments.  I love this stamp set and now we have a new one to use. . . In the Moment stamp set.  I love the sayings and the images in this set!  First, the cards from class to refresh your memory.


I don't know why, but I had these two card kits available without the third card so used them up.


The words and image are from In The Moment.  I used Misty Moonlight for card base and some vellum from the Vellum Layering Designs Designer Series Papers. 


For this card, I used a piece of the In the Wild DSP.  I thought this would make a cute children's birthday card or someone who works with animals!


Happy Crafting,

Desiree'

Tuesday, March 29, 2022

Calming Camelia

Although this stamp set, Calming Camelia is a Sale-A-Bration set, I love this floral image.  This card is using scrap card pieces from other cards I've made.  I'm trying to get through all of the "pieces" I have in different totes and I'm making progress!


I look forward to seeing you in one of my classes!  You can make the sample I make, or use your own creativity to make it your own.  

Happy Crafting,

Desiree'


Monday, March 28, 2022

New Card Fold

Today I'm sharing a new fold, Bay Window, that I wanted to learn before I taught a class!  These are my "test" cards, and I love them!  I  hope you will want to learn how to make these in a class soon!  I'm in love with the New Horizons 6 X 6 Designer Series Papers.  You can do so much with so little if you so desire.

This first card only has stamped sentiment on it from the So Sentimental Stamp set using Misty Moonlight ink.


This second card, I stamped some trees and birds on the DSP and then added the sentiment in Evening Evergreen using the Calming Camellia stamp set.


The third card is actually the first one I made for a friend who was having surgery.  This is the only one I stamped inside.  I again used Misty Moonlight ink, and a Paper Pumpkin stamp set which came in the August 2021 Paper Pumpkin Hope kit.  


And this is the last card I made.  I used some extra scraps to decorate the envelope as well.  The sentiment is in Evening Evergreen and I used the So Sentimental Stamp Set.


I hope you enjoyed today's share.  Come back tomorrow for some more cards I made using scraps and leftovers!

Happy Crafting,

Desiree'


Saturday, March 26, 2022

Get Messy, Have a Little Fun!

Let's get messy and have a little fun!  The shaving cream technique isn't hard, just messy.  I placed a small amount on my paper plate.  Added a few drops of ink refill.  


Then take a toothpick (or you can use your bone folder) and pulled it through the shaving cream. 


Now for the messy part.  Have quite a few 4 X 5-1/4 sheets of Basic White cut and ready to use.  You're going to place your paper face down in the shaving cream.  Press and slide.  Lift off and use bone folder to clean excess shaving cream off cardstock.  Place shaving cream back on the plate.  Set your piece of cardstock off to the side.  Continue with creating as many backgrounds as you want.  


And here's the card I made with some of these leftovers.

So when you're down or have a rainy day, get some shaving cream and play!

Happy Crafting,

Desiree'


Friday, March 25, 2022

Shaving Cream Leftovers

Shaving Cream Leftovers -- did you attend the Shaving Cream class?  If you missed it, here's a link showing the cards we made.   When working with this technique, I always make extras and set them aside.  This way I only have to get super messy once!

Here are a few cards I made with those extras I made.  Believe it or not they still have a slight scent of the shaving cream from three years ago!!


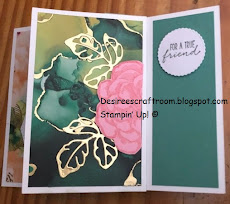
On this piece, I used Calming Camellia (Sale A Bration set).  I used Balmy Blue ink and my Stamparatus so I could stamp as many times as I wanted to get the shade I wanted.  I cleaned my stamp and only inked up the leaves and stem using one of my green inks (I cannot tell which color I used for sure!).

I then trimmed the image down to 3-3/4 X 5 and layered on a piece of Pacific Point cardstock.  Then I glued it to the Basic White base.  I die cut the layer for the sentiment using the Scallop Contour dies.  The sentiment is from Celebrating You.


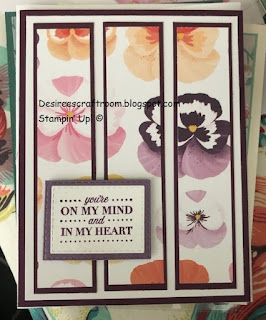
For the pink shaving cream, I thought I'd use one of my favorite stamp sets, even though it's retired, Magnolia Blooms.  Keep in mind, I had no clue what I was going to do with these images!


And here's the finished card.  I glued two flowers down on the "scrap" piece of embossed Very Vanilla and popped the third up on dimensionals.  The sentiment is also from Celebrating You and is popped up:


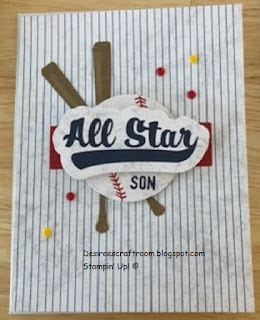
This last card was a bit tricky with stems and flowers.  I just kept cleaning and reinking the areas that I wanted.  I should have created a mask!  But I was playing and had fun!


After die-cutting the flowers, using the Shaded Summer Bundle, I then had to decide how to use these pieces.  Since I had a layer in my scraps, I mounted the flowers on it and blued to a Balmy Blue base.  Again, the sentiment is from Celebrating You.  Here's what I came up with!


Come back tomorrow for a couple of more shaving cream cards I made.

Happy Crafting,

Desiree'

Thursday, March 24, 2022

May 2016, Many Manly Moments Paper Pumpkin

Granted, May 2016, is a while back, but the good news is I did put the Many Manly Moments kit together previously.  Today's share is what I did with the negative parts of the different Happy stickers that were in the kit.  

Here are the two cards I made:


I used the negative of the word "Happy" on this card because I loved the Pool Party outline.  To make this pop, I layered it onto a piece of Night Of Navy scrap.  I then glued it to the orange paper that was included in the kit.  I stamped "Birthday" on a scrap piece of Basic White and glued that down.  Below, is the inside of the card.  I left it uncolored depending on who receives the card!


This second card I left as is.  I took the negative of all the cursive "Happy" and attached it to the front of my Pool Party base.  This can be used for any occasion!


Happy Crafting,
Desiree'


Wednesday, March 23, 2022

Remake of Card Kits Available

I have two classes that I held last year that I have kits for.  If one of these are something you would like to come and make, please contact me!

I did not do a remake of the Great Tidings Pinwheel Card.  I have one kit available for this card, but can cut more if more than one person wants to come to class!  

Here are the original cards we made:


And here is the remake of the second card:  


I have three of these kits available.  Schedule a class before I make them up and put away all supplies!

Almost forgot!  Here's the second class -- no remakes done at this time.


Happy Crafting,

Desiree'


Tuesday, March 22, 2022

Using Your 6 X 6 Designer Series Papers

Today's post is all about using your 6 X 6 Designer Series Papers (DSP).  Keep in mind that you can use these tips for 12 X 12 DSP as well.

The first four cards I'm showing are made with one sheet of 6 X 6 DSP.  Basically, all I did was cut the DSP into quarters, so each is 3 X 3 square.  I then mounted this onto 3-1/4 X 3-1/4 matting.  I added one more layer of matting because I decided I didn't want that much white showing.  This mat is 3-1/2 X 3-1/2.  I centered each on a piece of Basic White cardstock and stamped a sentiment.  The sentiments on these cards are from the Special Moments stamp set from Sale-A-Bration.  


I now have four beautiful cards ready to send!


This last card was made from scraps of 6 X 6 DSP.  You don't have to wait for scraps to make this style of card.  I just cut 1/2"strips and mounted on a mat (1").  To get my spacing right, I placed the left and then the right piece on first.  I then placed the other two down so I could see where I wanted to glue them down.  The butterfly is shimmery and cut using the Butterfly Brilliance Bundle.  The Thank You is from a retired set, Blended Seasons. 


I'm also including a card that has the strips go all the way down the front of the card.  Play with different lengths to see what you like best!


Happy Crafting,

Desiree'


Monday, March 21, 2022

Life Happens

Life has been a challenge for the last six months and will continue to be challenging for two more months!  Today, as you are reading this, I'll be sitting in the waiting room while my husband starts chemotherapy.  Then on Thursday, he starts radiation in conjunction with chemotherapy.  

I will not be holding SCHEDULED classes, however, if you'd like to have a class, contact me!  Evenings (6-8 pm) and weekends are available.  

I have been playing with catch up with my  Paper Pumpkin kits.  Today, I'm featuring the Batter Up! kit, May 2021, because it's spring training time.

I used up most of the kit making one of each as recommended.  I then went out to find some alternative ideas to get my creative juices flowing.  Here's what I came up with.


I love the stamp set as it has Dad, Brother, Son, Friend, etc.  I changed a few things, whether adding or eliminating jewels or backgrounds for the sentiment.  Lots of ways to change up the look.  Come back tomorrow for some 6 X 6 Designer Series Papers cards and tips.

Happy Crafting,


Desiree'