Saturday, April 30, 2016

Stand Up Post It Notes for Mom and Dad

I had a mad rush on my Stand Up Post It Notes, so I thought I would make these for the parents.  I know Father's Day is a ways off, but I couldn't make a Mother's Day one without making a Father's Day.

I used the retired stamp set, Delightful Dozen, for both of these post it note holders.  I used Pretty In Pink on the Mother's Day and I used Night of Navy on the Father's Day one.


Let me know if you would like to drop in make your own Stand Up Post It Note as gifts for someone else or for yourself!

Happy Crafting,

Desiree'

Friday, April 29, 2016

Mother's Day Card

I thought I would play around to make a sample card that we can do in a Mother's Day Gift Class.  After making this card, I realized it has too much activity to do in a class since I only have one set of  Botanical Blooms stamps and one set of Botanical Builder framelits. 

On this card, I used the Happy from the Hello You Thinlits and words are from the Crazy About You Stamp set.  


I don't know if you can see on the picture, but each of the leaves are stamped and then die cut as well as the smaller flowers.  

This was fun to make and I hope a very special Mom gets this card from their kids!

Happy Crafting,

Desiree'

Thursday, April 28, 2016

Open Tealights

Today's share are some tealights I had cut and just got around to putting them together after I die cut the lower shape out of the centers.  

I used All Is Calm retired Stampin' Up! Designer Series Paper on these tealights.


Once I die cut the Curvy Keepsake Die, I then put the two pieces together to get the flower in the same place.  The flower I used is from the Floral Framelits which are retiring as well.  

I love the nice soft look of the tealights in these.  These can be used throughout your home and also as night lights.  I have cool burning LED tealights in each of my Tealight Keepsakes.

Remember, if you cannot come to the Branson Mill to make your purchase, I also have them for sale here on my blog. Just Click on the Crafts for Sale tab and let me know what you would like to purchase.  I will send you a Paypal invoice for those items!

Happy Crafting!

Desiree'

Wednesday, April 27, 2016

New Stampin' Up Catalog Questions

Class Reminder:  We're having a Paper Towel Scrapbooking Class today at the Branson Mill Craft Village in Desiree's Craftroom, starting at 12:30.  I hope to see you there!  

I’m hearing so many questions about the new catalog so here is an update for you!

--The soonest date you can start ordering from the new catalog is June 1st around 3 am Mountain Time.

--When will I have catalogs? I will be able to order catalogs on May 3rd. I will be handing out the 2016-2017 catalogs to those who placed an order over $25 from me in the last 6 months (Nov 2015). You can come to the Branson Mill to pick up your catalog as soon as you see a post that I have received them!

-- If, for any reason, you didn't place an order since November 2015 then you will not be on the list to receive one free; but you have this week to place an order and I will add you to the list. If this is not an option and still would like a catalog please e mail me for arrangements.

 ***If your wish list is long with lots of product, and you would like them in your hands sooner, including the new In-Colors, it is all possible.   If you join my team between May 3rd to the 30th you can get them in your starter kit ***  There is no obligation after you join. It’s always a great deal to join my team for $99. You get to choose $125 of product and shipping is FREE! Here is the link to join my team!


You do not have to hold parties, nor push the product. Stampin' Up! products speak for themselves.  If you love a framelit set, and use it alot, your stampers will fall in love with it too!  

Let me know if you have any questions about joining Stampin' Up!  

Happy Crafting,

Desiree'

Tuesday, April 26, 2016

Custom Card

While working on my other projects, we had a customer come up to the counter and ask if we could make her a card for her boyfriend.  

She selected what she wanted on the card, and using our Cricut Explore, we die cut the Army and Navy hats she selected.

For the words, I had her hand-write the sentiment and then I edged and mounted this onto the front of the card.  We stamped combat boots, from the Stampin' Up! For Your Country stamp set on the inside.


Stop on into the Branson Mill Craft Village and let me know what you would like to have made just for you!

Happy Crafting,

Desiree'

Monday, April 25, 2016

Piggies, Anyone?

As many of you know, I love my Curvy Keepsake Die!  I also love to show you ways to use all those punches that are sitting on your shelf, so I decided to hold a critter class last year.  I'd love to hold another critter class with you; just let me know when it will fit into your schedule!

Here's my newest creation.  I had a woman stop at my store and ask about the critters.  I had just gotten the foxes done and was going to work on another critter.  (All of these had sold and I still need to make bears, penguins, and Angry Bird, oh my!)

Well, she asked if I had any pigs.  Sadly, I had none and hadn't designed any.  So off to Pinterest I went to get my creative juices flowing.  I saw a few I liked, so I tweaked their ideas and made my own!  


I absolutely LOVE how this piggy turned out.  And, of course, I thought of my upline, Susie Wood, as I was making them as she and her husband raise pigs!

Here is a close up so you can see the cute little feet!


Well the lady that asked for the pig box told me the reason why she wanted the pig!  Can you guess why?  No, she is not a pig farmer!  Her last name is Pig!

I hope you enjoy today's share!

Happy Crafting,

Desiree'

Saturday, April 23, 2016

Finished Paper Towel Roll Scrapbooks

I had painted these scrapbooks before my class so I had everything ready for me to finish these up.  I've done three baby books and two other scrapbooks.  These are available for purchase at my store, Desiree's Craftroom, in the Branson Mill Craft Village or on line.  

The first three are for a baby brag book, done in blue, pink, and yellow.  I've included ribbons, stickers, and extra cardstock to finish the projects.


These two are for friends and or family.  


Not local?  Send me an email letting me know what you are interested in to make sure I still have it in stock.  If I don't have it in stock, you can special order the item!  Like something, but not the color?  Just drop me a line so I can make the item in the colors you want.  

Be sure to let me know when you would like to come in and make your Paper Towel Scrapbook.  I will be holding this class every Wednesday, starting at 12:30.  Because it is done in steps, you will need to be prompt.  Stop at the front counter and let the cashiers know that you are here (at the Branson Mill Craft Village) to take the Paper Towel Scrapbook class.  They have the class fee there so you can pay before you come back!

Happy Crafting,

Desiree'


Friday, April 22, 2016

Paper Towel Scrapbooking Class

I'd like to express a big shout out -- THANK YOU! -- to Meralee and Nancy, for attending this week's Paper Towel Scrapbooking class.  This class was held on Wednesday, starting at 12:30.  


We work from scratch, cutting the paper towel rolls, painting, selecting what papers we use, and so forth.  I open up my scrap bin, punch out bin, and ribbons and fibers bins.  You get to select what you'd like to use for your scrapbook.


Here are their finished projects:


Be sure to contact me to let me know which Wednesday you would like to come in and make your own!  

Come back tomorrow for pictures of scrapbooks I finished on Thursday!

Happy Crafting,

Desiree'

Thursday, April 21, 2016

Graduation Card

I love Smokey Slate and Night of Navy together!  


To make this graduation card, I embossed the Smoky Slate piece, 4 X 5-1/4, with my Stars embossing folder.  I then added my ribbon by attaching ends to the back of the embossed sheet.  I then used Tombow liquid glue, but you could also use dimensionals, to adhere this to the Night of Navy base.  I cut another piece of Smoky Slate, 4 X 5-1/4, for the inside to make it easier to write on.

I used March's Paper Pumpkin stamps to stamp the sentiment on the front and added the graduation cap to both the sentiment on the front and on the inside.


The Congratulations is from a retired stamp set where I masked off the other words.  

I like how this came out.  I hope you do too!

Happy Crafting,

Desiree'


Wednesday, April 20, 2016

Stampin' Up! Family

When you join Stampin' Up! you are joining a family business but you are also joining a new family.  I love to talk with my visitors at the Branson Mill and I especially love talking and sharing with other Stampin' Up! demonstrators.  

Yuki stopped in for a visit and we chatted for quite some time.  It was great to meet a demonstrator who signed up before the demonstrator numbers were over 50000.  Although she is no longer a Stampin' Up! demonstrator, we shared lots of ideas, laughs, and pictures.  


Thank you, Yuki, for a wonderful visit and I look forward to seeing you again soon.

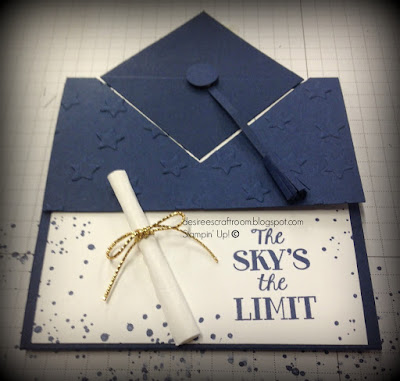
Here is a graduation card I CASEd (Copy And Share Everything) from France Martin, another fantastic demonstrator in our Stampin' Up! family.  


Here is the card with the top portion opened.


I used a retired embossing folder for the top piece, and the stamp "The Sky's the Limit" is from the Over The Rainbow stamp set.  I used a long retired stamp, Congrats, Graduate, from All Year Cheer II or III for the inside.  A gift card slips inside the pocket and still have room to sign your name!


I also made this card in blue for Hollister School district.


I hope you've enjoyed today's share and I will have another Graduation Card tomorrow!

Happy Crafting,

Desiree'

Tuesday, April 19, 2016

Retiring Stampin' UP! Products

Here is a link, where you can easily see the items that are retiring. This PDF is really small print.  You may want to download it and then open in PDF and enlarge the font.  

As noted, items are while supplies last and the In Color ink pads, refills, etc., are usually the first to run out. Once the item is gone, there will be no more! Order early to get what you want.

Please use Hostess Code, 2AS944AS, when placing your order.  I will go through my stamp sets and will be placing them here on the Stamps for Sale tab when I decide what needs to find a new home.

I'll be going through the new catalog soon and I can begin preordering on May 3rd.  So that will give me a little time to play with some new stuff before you get to place your orders on the 1st of June.  

Be sure to let me know if you need a catalog!

Happy Crafting,

Desiree'

Monday, April 18, 2016

Butterfly Tealight

Here is the last tealight I worked on on Wednesday.  Thinking of my sister, Marilyn, I selected yellow Designer Series Papers (DSP) and butterflies!

Again, I cut the Curvy Keepsake base from Whisper White Cardstock using the Curvy Keepsake Dies from Stampin' Up! I then die cut the DSP for the box.

It was a tight fit, but I used the smallest butterfly from the Butterfly Framelits and cut the shape from both the base and the DSP.  I adhered my vellum to the DSP.  I then used the butterfly from Butterfly Basics stamp set and inked with Versa Mark and stamped the vellum, fitting the stamp where the DSP outline was.  I then adhered the DSP to the base.  

I hope you can see the floral butterfly in this picture!


If you cannot, be sure to stop by the Branson Mill Craft Village to see this in person.  Or contact me for more pictures!!

Happy Crafting,

Desiree'

Saturday, April 16, 2016

Retired Stamps Sets For Sale

Did you know I have a page here where I sell my Stamp Sets?  Up at the top, there is a Menu Bar (photo below).

Click on each of these pages to see what I have going on, what's for sale, etc.


I updated my Stamp Sets for Sale page today! 

Take a look and let me know if there is a stamp set you want to purchase.  I will send you a Paypal invoice for payment and then it will be shipped to you!  

Happy Crafting,

Desiree'


Shadowed Tealight

Today's share is another tealight I made using the Curvy Keepsake Die.  Since I got back from vacation, I've been trying to get my Curvy Keepsake box inventory back up.  I am out of Fox, Bear, Angry Bird, Penguins, and Minions. Well, I needed to get the tealight boxes done first. 

Before I joined Stampin' Up!, I bought papers whenever I found a good deal.  

If you're like me, you purchase papers when they go on sale. Who can resist a 50% off at Joann's?  Not me!  

So today's share is made using Stampin' Up! Whisper White cardstock and Die Cut With a View papers.  I also added vellum between the paper and the white cardstock to give it a shaded glow.


I hope you enjoy today's share and find a way to use up those papers you have stashed away!  These make great house warming gifts and wedding gifts.  These illuminate a room safely and you don't need to worry about forgetting to snuff out the candles!

I use the LED tealights in my boxes and they last a long time. I hope you will drop in to see my creations at the Branson Mill Craft Village in Branson, MO.

Happy Crafting,

Desiree'

Friday, April 15, 2016

Curvy Keepsake Tealights

Today's share is a tealight I made using some retired Designer Series Papers (DSP) from Stampin' Up! I know, right?  Yes, I continue to use retired DSP so I can get my stash down so there is room for the new!  Our new catalog comes out on June 1st so be sure to watch here for some new papers next month.

As a demonstrator, I get to preview and preorder new items before you get to see them.  You may ask, "why?"  So I can use the new product and prepare new things so when the catalog goes live, I can share my experience with the new products!

So on to today's share.  I made this because my tealight boxes were getting low.  I sold the wedding one so I was down to one every day tealight.

I cut the box out of Whisper White cardstock and then cut the DSP using the Curvy Keepsake die.  I trimmed the one side of DSP so the handles remained white.  Using the Floral framelits, I die cut the center out on all four panels.  I left the windows "open" to see how well this would sell. 


Well, I have to tell you, before the end of the day, this one was sold!  

Be sure to let me know whether you prefer the open window or the one's made with vellum in the centers.  Here's one I made last year to compare.


Come back tomorrow for some more tealights!

Happy Crafting,

Desiree'


Thursday, April 14, 2016

Large Hallet Bags

Since I sold the largest bag I had made, I made another one and wrote instructions this time for the larger size.  I will need to decorate this bag a little before putting it out to sell, and will do so while at the Branson Mill.  I will put four cards with envelopes inside as well.

To make the handles sturdier, I doubled up on the cardstock so these handles are 11 X 2 and scored at 1".  I then used Tombow Multipurpose glue and my bone folder to ensure the handles were bonded together.  


I really enjoy making these and I hope you do too!  They are great for a variety of little gift ideas.  The woman that purchased the other bag, was buying it as a sample so she can put a tea towel and a cup inside the bag as a gift.  I hope you enjoy today's share!

Happy Crafting,

Desiree'

Wednesday, April 13, 2016

Last of Weekly Deals

REMINDER:  This is the last Weekly Deals that Stampin' Up! is going to offer.  Since they have depleted their excess stock, Weekly Deals are going away.  They will occasionally offer sales, and I will post when they occur so you don't miss out!

For this week, these are the items on sale.  Punches, Thinlets and Framelits, oh my!  Lots of items here on sale -- be sure to order early so you get what you want!

We have used many of these items in our crafting.  I'll post some of the projects below!


Here are some of the projects I made using some of the sale items above!

Rose Garden Thinlits


Sweetheart Punch

Mini Treat Bag Thinlit Dies
Remember to check out the Clearance Rack as well because more items were added!  We are using this Hostess Code:  6F7BMHWB, until Saturday, April 16th!

Happy Crafting,

Desiree'


May Day Baskets

Here are three baskets that I made for May Day as well.  I left tags off so they can be customized to your liking!  

On these, I used Stampin' Up! Whisper White Thick cardstock.  I covered the outside with Botanical Gardens Designer Series papers on two of them and some retired designer series paper on the third one.  These are really cute and great to hang on a neighbor's door handle.  You can also leave them as a gift any day of the year!


I put a little grass in these as I didn't have any floral Styrofoam; but you can add candies and other small gifts in these.

Happy Crafting,

Desiree'

Tuesday, April 12, 2016

May Day Bags

What is May Day? Well here are some exerpts from the web:

May Day (May 1st) is celebrated in many places around the world. The traditions and stories surrounding May Day vary from place to place. There is, however, one thing that is similar in most celebrations - the use of flowers!

Back in simpler times, people rang in the first of May with a particularly charming and elegant tradition:  they would take all the flowers that they had gathered at the end of April's showers, arrange them in pretty paper along with some gifts and candies, and then hang them on the doors of friends and neighbors as a way of welcoming them into warmer weather.

Of course, it was also a way of letting a romantic prospect know that you cared for her, as boys would often hang baskets on the doorknobs of the ladies they fancied, knocking on their doors before bolting away. If the lady in question caught the gentleman leaving the basket, she was then tasked with chasing him down in an effort to steal a kiss.

Perhaps considered quaint now, in decades past May Basket Day — like the ancient act of dancing around the maypole — was a widespread rite of spring in the United States.

Here are a couple of the Hallett Bags I made using retired designer series papers to create May Day Bags. These are smaller bags that will fit a small piece of floral Styrofoam and you can make your own paper flowers or put real flowers in them to give to your neighbor on May Day.  I used the Perfect Pairings stamp set and the Perpetual Calendar Stamp Set to create the Happy May Day tags.


Happy Crafting,

Desiree'

Monday, April 11, 2016

Last of the Stand Up Post It Notes

Today's share are a few of the post it notes I made with scraps of retired designer series papers that I found in my scrap bin.  It's amazing what you can make with scraps!

First up is Soft Suede and Pool Party layered with coordinating designer series papers.


This second one is made with Pool Party as the base and More Mustard (retired color) to layer with the designer series papers.  I stamped the words using Soft Suede Ink.


This last one was made using some designer series papers I had cut for a Stand Up Post It Note class. I still offer this class so let me know when you would like to attend!


Happy Crafting,

Desiree'

Saturday, April 9, 2016

Lucky Limeade Base

Today's share are the Stand Up Post It Note Holders I made using Lucky Limeade as the base.  Again, they have different words and color combinations, but I like how they turned out. What do you think?


I hope you are enjoying some of the projects I created before leaving to visit our grandsons, Camden and Carter, in Orlando, Florida.

I will be back at the Mill crafting purses and/or May Day Baskets on the 12th of April!

Happy Crafting,

Desiree'